

I’ve been absent from my blog for a bit….so much going on and just not enough time. Thanksgiving Holidays, footballs games, and a surprise trip for my Mom’s 90th Birthday. But I’m back and I have lots of cards, treat holders and other fun projects to catch up on and share with you.
It’s December now and that means snow…..if you are fortunate enough to live in a area that actually gets some. I spend most of my time dreaming about it….so I like to make lots of snowmen cards! The first is this this cute card with a wavy greeting.

The snowman is waving, so why not the greeting too? The colors aren’t traditional Christmas red and green, but when you are having fun with snowmen, you should have fun with the paper too! This is from the Let it Snow Designer Series Paper and features the colors Flirty Flamingo and Coastal Cabana. You might not be able to tell, but the paper also has a little bit of shine and shimmer. If you look closely at the snow on the trees you should be able to see it.
The Snowman is fun too and is easily punched with the Snowman Builder Punch that is part of the Snowman Season Stamp Set Bundle.

If you use your Stamparatus to line up the stamps for the snowman, you can punch out the snowman, arms, hat and nose all in one punch! It’s easy and this is how you do it: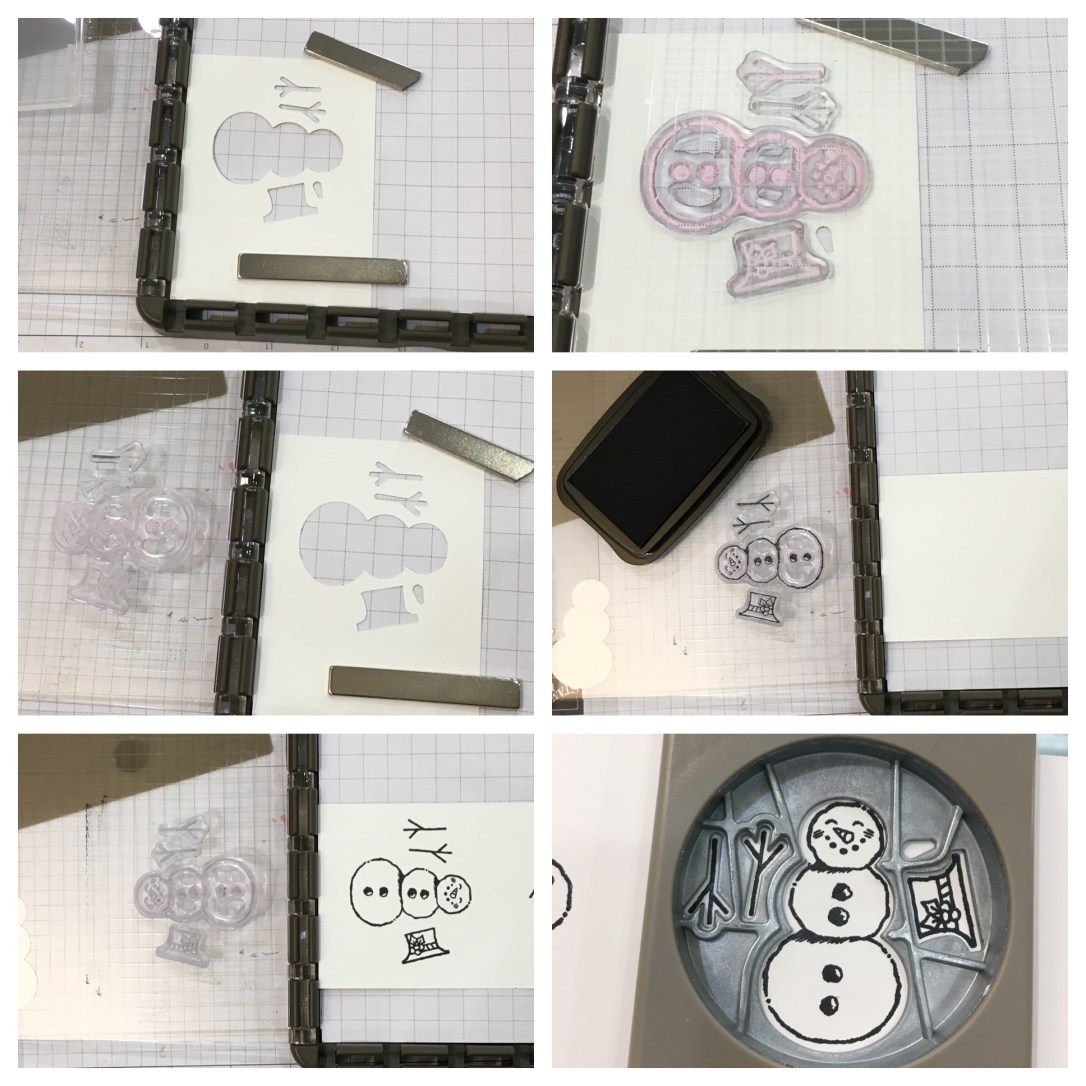
- Make a stencil using a scrap piece of cardstock by using the punch.
- Place the stencil on your stamparatus base.
- Place the stamps in the correct position in the stencil, then close the plate so the stamps are ready to go.
- Replace the stencil with a piece of Whisper White Cardstock. Ink up the stamps and stamp as usual by closing the plate.
- Insert your stamped image into the punch and you’re done!

I put the snowman on dimensionals and attached him to a Whisper White Oval that I had used a light Bermuda Bay Stampin’ Blend to “scribble” the background. I then put a little Multipurpose Liquid Glue on the ends of the arms and adhered them to the snowman body. The hat is colored with Stampin’ Blends markers and also adhered with dimensionals.

Then is was simple to just place my ovals on the card base, cut my banner with the sentiment and my card was done! Oh, but I did stamp another snowman on the inside….you know how I like to have a little something there!

If you’d like to make this card, this is what you’ll need:
- Snowman Season Stamp Set Bundle (with Snowman Builder Punch)
- Layering Ovals Dies
- Flirty Flamingo Cardstock – Cut 5 1/2” x 8 1/2”, Score and fold at 4 1/4”
- Coastal Cabana Cardstock – Cut at 5 1/4” x 4” and a piece 2 1/4”x 3 1/4” for scalloped oval
- Let is Snow Designer Series Paper – Cut at 5” x 3 3/4”
- Whisper White Cardstock – Cut 5 1/4” x 4” (inside) and a piece 2 1/4” x 3 1/4” for oval and a piece 2 1/4” x 3 1/4” for snowman, hat & arms
- Ink: Memento Tuxedo Black and Cherry Cobbler
- Stampin’ Blends Markers: Pumpkin Pie Light, Basic Black Light, Shaded Spruce, Cherry Cobbler and Bermuda Bay Light
- Snail Adhesive, Multipurpose Liquid Glue, and Stampin’ Dimensionals
Happy Stamping!
Patricia
It’s a 24 Hour Flash Sale!
On December 11th only, place an order of $50 or more and get FREE SHIPPING! Start making your list now and then come back on Wednesday and place your order!

TODAY is the DEADLINE to order December’s Paper Pumpkin…. December’s Something for Everything kit includes a super-versatile stamp set complete with 13 sentiments that can be used for occasions ranging from wedding, to get well, birthdays, and more! Plus, the three full-sized card designs (four of each) are gorgeous! Paper Pumpkin’s December kit makes it easier than ever to give a handmade card to a friend—no matter what the occasion! If you’d like to subscribe to Paper Pumpkin, please click HERE.

Ready to shop? If you would like to place an order or check out products for more information, please click on the shopping link below and you’ll be taken to my online Stampin’ Up! Store. If you don’t already have a demonstrator, I would be honored to be yours! I can answer any questions, or help you choose supplies for your projects. If your order is less than $150, please use my December Host Code HGU6DJ6E and choose me as your Demonstrator when prompted during check-out.

If you place an of $50 or more and use my Host Code during the month of November, I’ll send you a package of Jingle Bell embellishments as a thank you from me!
If your order is $150 or more, please do NOT use the Host Code as you will receive Stampin’ Rewards of your own. Rewards start at $15 worth of free products of your choice. Don’t forget to choose me as your demonstrator during check-out so you can receive your Jingle Bell Embellishments from me.
These are the products I used to make today’s card. Click on any of the images to be taken to my online Stampin’ Up! Store where you can get more information and purchase the items you need.
")

")


